Asterisk Monitoring
Comprehensive monitoring solutions for your Asterisk PBX infrastructure and upstream trunks
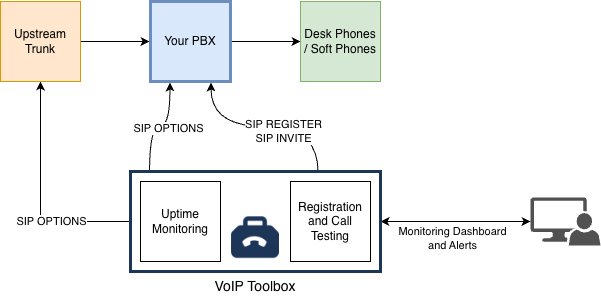
VoIP Toolbox and This Guide
VoIP Toolbox is a comprehensive monitoring solution for your Asterisk system. It allows you to monitor your Asterisk PBX system and upstream trunks, and provides a comprehensive testing setup that covers multiple aspects of SIP functionality.
This guide will walk you through setting up registration and call testing for your Asterisk system.
- Registration testing verifies that your PBX can accept and authenticate SIP registrations, which is critical for ensuring your system is ready to handle user connections.
- Call testing verifies that your PBX can process actual call attempts end-to-end, which is critical for ensuring your system is ready to handle user calls.
Setting Up Registration Monitoring for Asterisk
This guide will walk you through setting up registration testing for your Asterisk system. Registration testing verifies that your PBX can accept and authenticate SIP registrations, which is critical for ensuring your system is ready to handle user connections.
Create a Test Extension in Asterisk
For registration testing, we'll configure a new testing-only extension. This extension will be used exclusively for monitoring purposes and won't interfere with your production users.
Extension Number Selection: Choose a number outside your main user range. For example, if your users are in the range 1000-1999, use 9000 as your test extension so it's clearly separate.
Important: You'll need to edit your Asterisk configuration files directly via SSH.
The configuration file location depends on whether you're using the legacy chan_sip
module (sip.conf) or the newer chan_pjsip module (pjsip.conf).
Most modern Asterisk installations use PJSIP.
For PJSIP (Recommended)
If you're using PJSIP, edit /etc/asterisk/pjsip.conf (or your Asterisk config directory):
- SSH into your Asterisk server
- Edit
/etc/asterisk/pjsip.conf - Add a new endpoint section for your test extension
[9000]
type=endpoint
context=default
disallow=all
allow=ulaw
allow=alaw
auth=9000
aors=9000

[9000]
type=auth
auth_type=userpass
password=YourSecurePassword123
username=9000

[9000]
type=aor
max_contacts=1
Configuration Notes:
- Extension: 9000 (change to your desired test extension number)
- Password: Replace
YourSecurePassword123with a strong password - you'll need this for VoIP Toolbox - Context: Ensure the context matches your dialplan (usually
defaultorinternal)
For Legacy chan_sip
If you're using the legacy chan_sip module, edit /etc/asterisk/sip.conf:
- SSH into your Asterisk server
- Edit
/etc/asterisk/sip.conf - Add a new peer section for your test extension
[9000]
type=friend
secret=YourSecurePassword123
host=dynamic
context=default
disallow=all
allow=ulaw
allow=alaw
Configuration Notes:
- Extension: 9000 (change to your desired test extension number)
- Secret: Replace
YourSecurePassword123with a strong password - you'll need this for VoIP Toolbox - Context: Ensure the context matches your dialplan
Critical Step: After editing the configuration file, you must reload the Asterisk configuration.
Connect to the Asterisk CLI and run: pjsip reload (for PJSIP) or
sip reload (for chan_sip). Alternatively, restart Asterisk:
systemctl restart asterisk
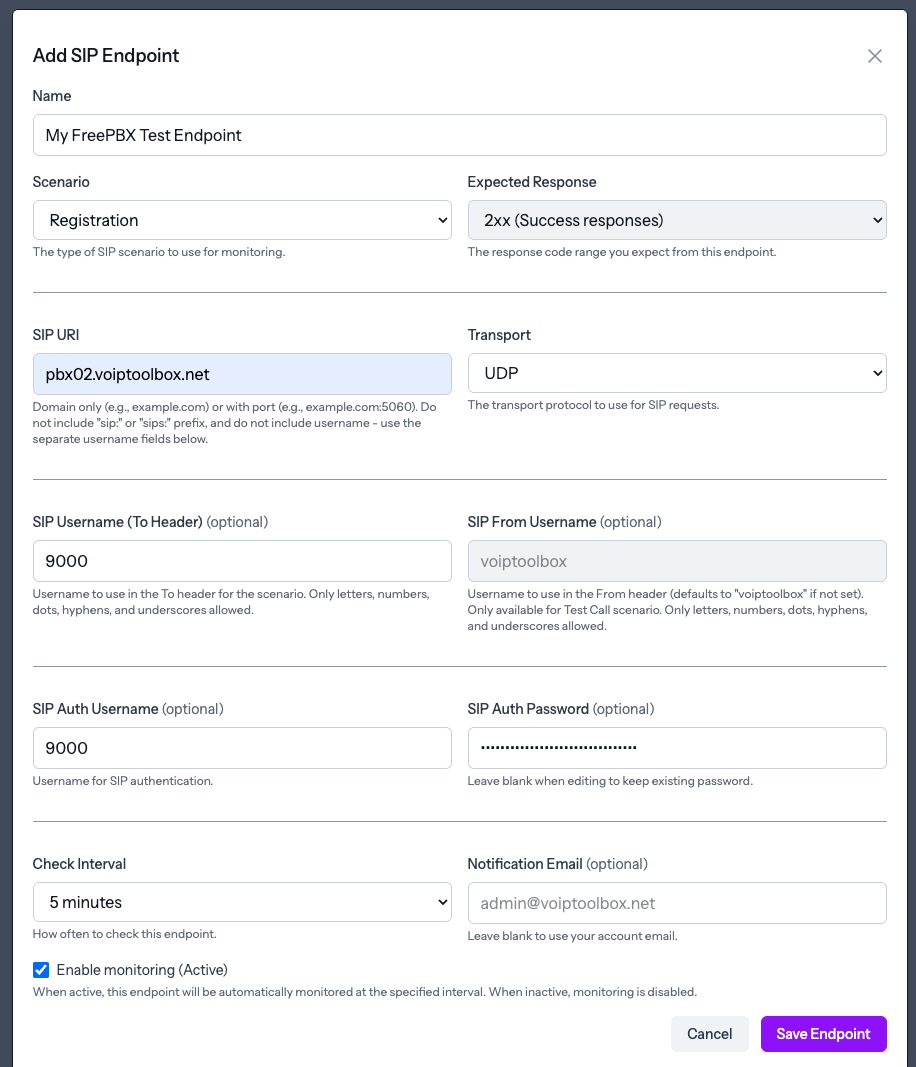
Configure Monitoring in VoIP Toolbox
Once your test extension is created and Asterisk has been reloaded, you're ready to configure monitoring in VoIP Toolbox.
- Navigate to VoIP Toolbox Pulse
- Click Add New SIP Endpoint
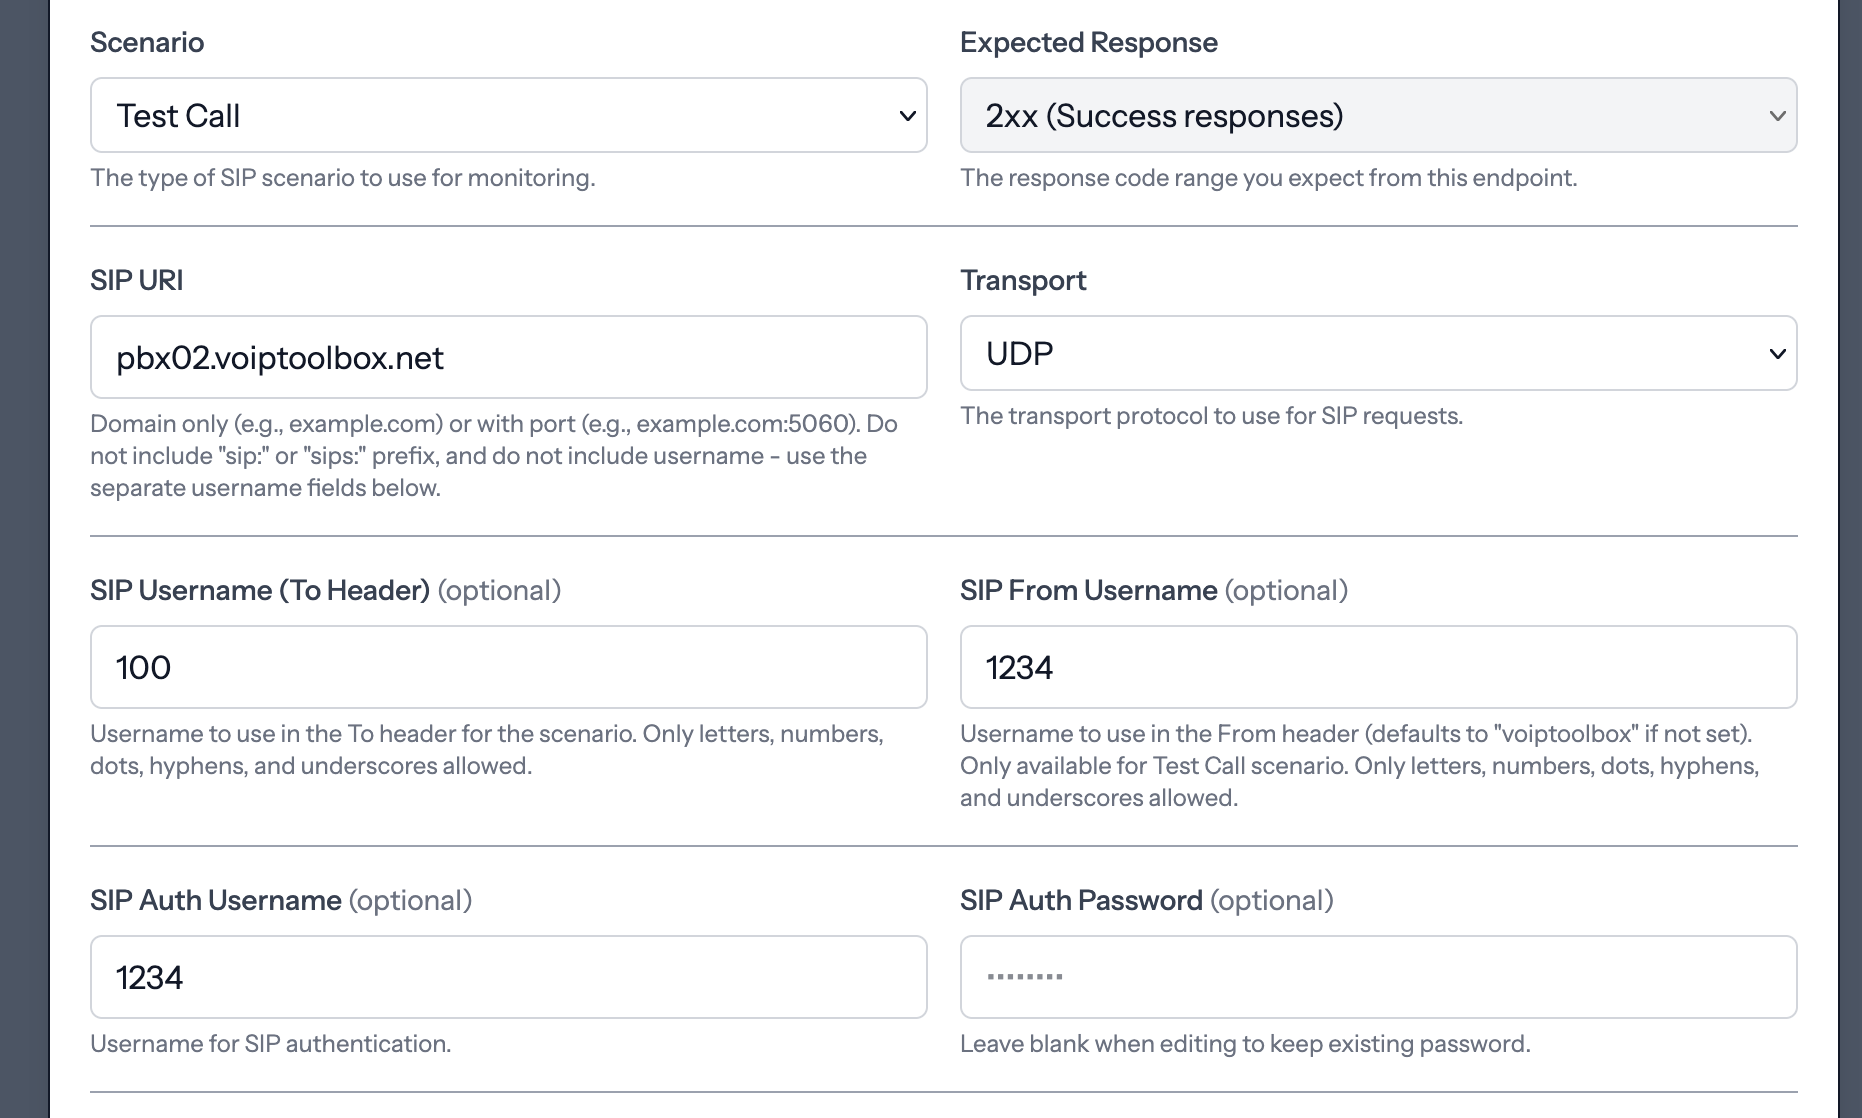
- Fill in the form with the following details:
Required Fields:
- SIP URI
-
Enter the hostname of your Asterisk server and optional port. If no port is specified,
5060 will be used. Example:
pbx.example.comorpbx.example.com:5060 - Protocol
-
Select the transport protocol your Asterisk server is using: UDP, TCP,
or TLS. Check your
pjsip.conforsip.confto determine which transport is configured. - Scenario Type
- Select Registration from the dropdown.
- Auth Username
-
Enter the extension number you created (e.g.,
9000). - Auth Password
- Enter the password/secret value you set in your Asterisk configuration file.
- To User
-
Enter the same extension number (e.g.,
9000).
Click image to view full size
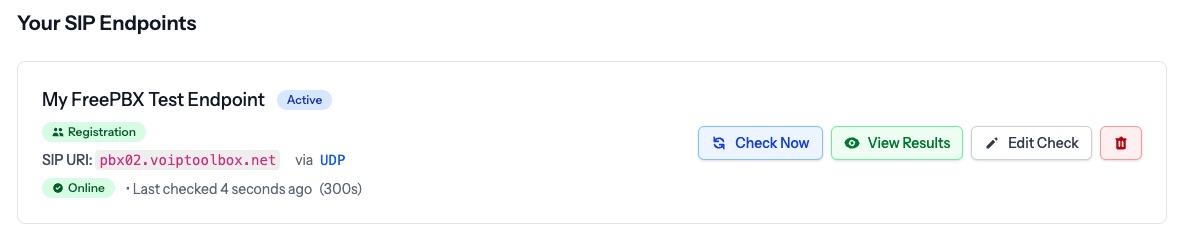
After Saving: Once you complete the form and click Save, it may take a minute or two for the first check to run. The system needs to initialize the monitoring schedule before the first test executes.
Click image to view full size
Click image to view full size
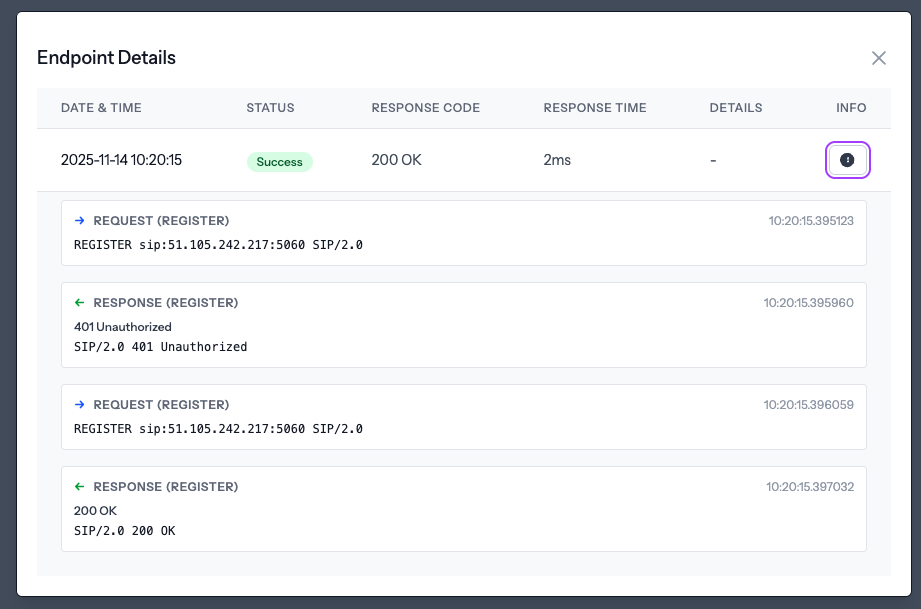
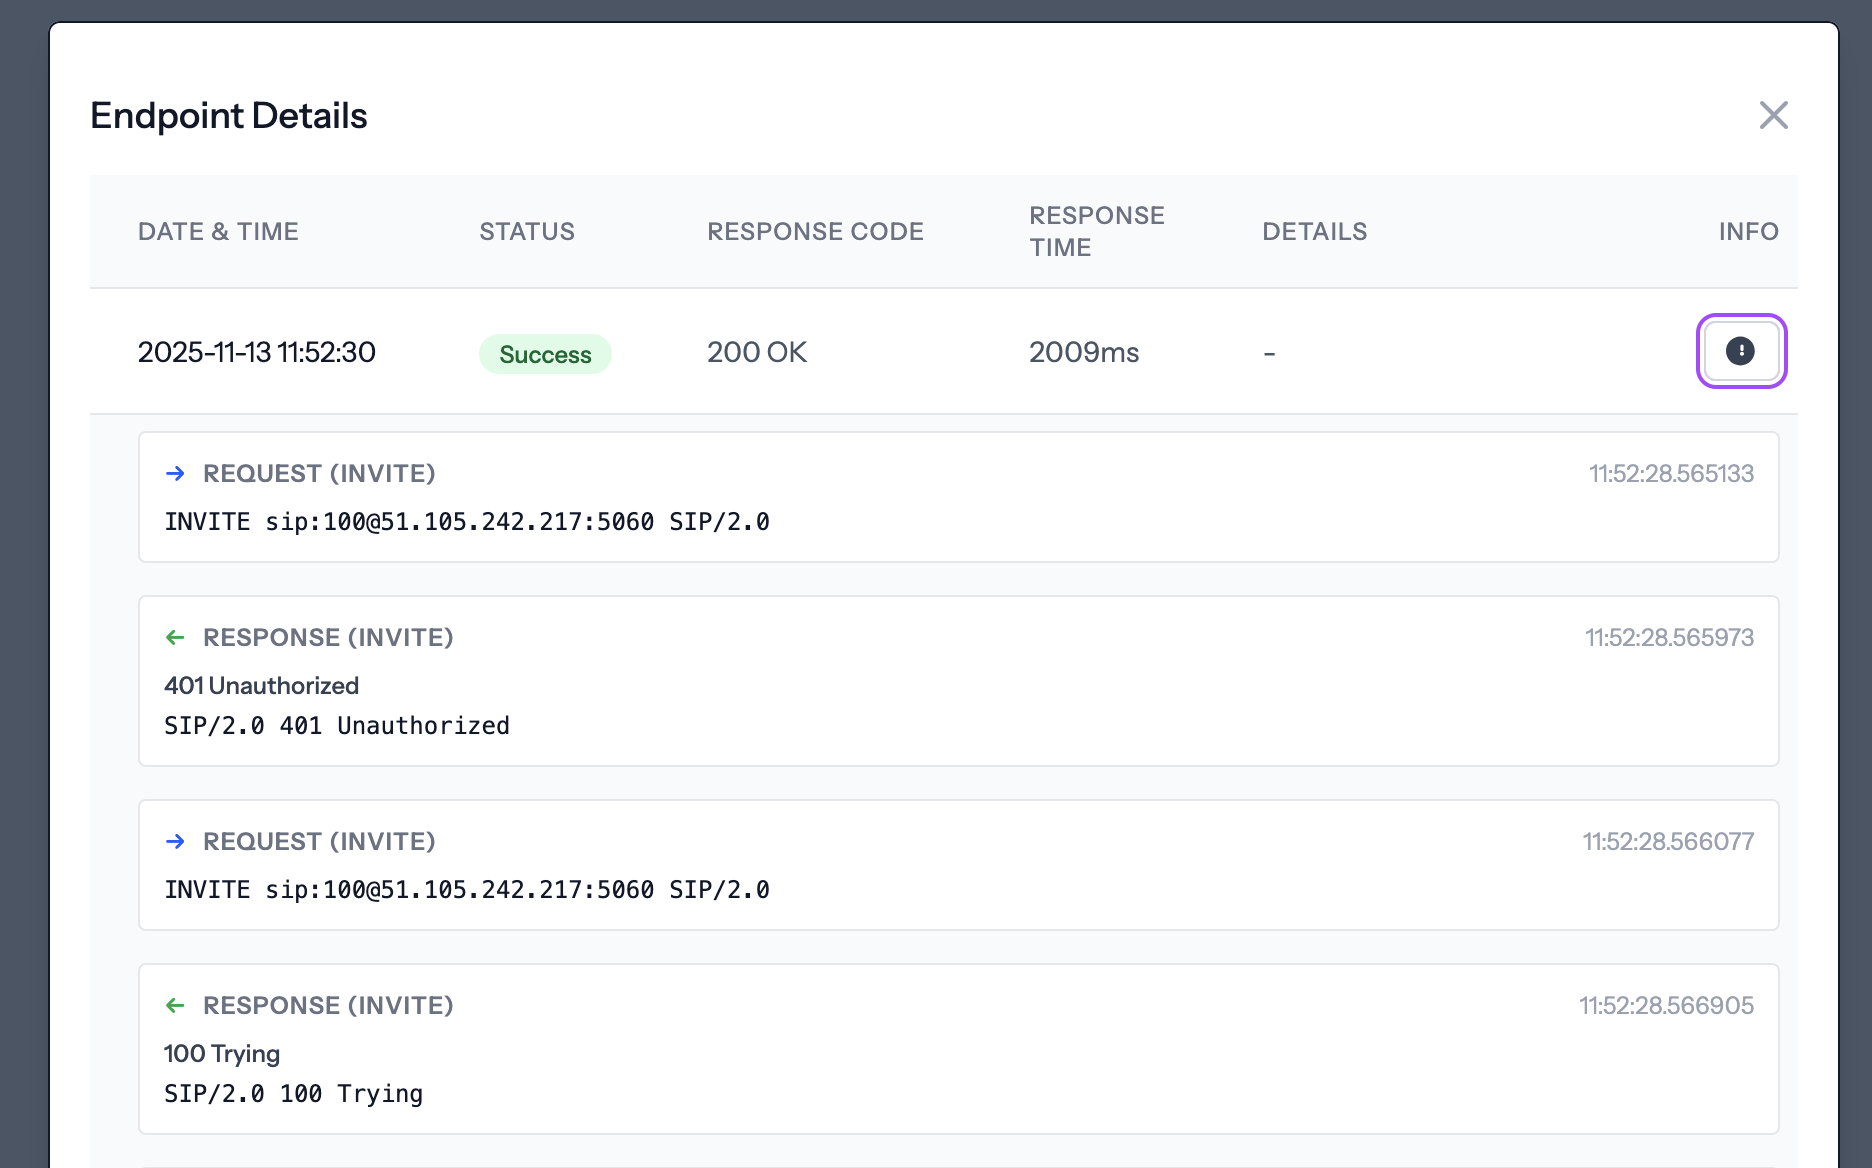
Monitoring Active: Once the first check completes, you'll see the registration status and can view detailed SIP message exchanges. The monitoring will continue running at your specified interval, keeping you informed about the status of your Asterisk registration.
Get Started
Ready to set up active assurance for your Asterisk PBX? Sign up for Pulse to access our infrastructure assurance tools and configure monitoring for your PBX and upstream trunks.
Setting Up Call Testing for Asterisk
This guide will walk you through setting up call testing for your Asterisk system. Call testing verifies that your PBX can process actual call attempts end-to-end, which is critical for ensuring your system is ready to handle user calls.
Part 1: Configure Asterisk for Call Testing
To test calls, we need to set up a dialplan extension in Asterisk that will play audio when we call our test number. This involves placing an audio file in the Asterisk sounds directory and creating a dialplan entry.
Step 1.1: Add a Test Audio File
First, we need to add an audio file to your Asterisk sounds directory. This is the audio file that will play when we call our test number. It can be anything at all.
- SSH into your Asterisk server
- Navigate to your Asterisk sounds directory (typically
/var/lib/asterisk/soundsor/usr/share/asterisk/sounds) - Copy or download an audio file (WAV format recommended)
Need a Test Audio File? You can download music on hold files from
https://downloads.asterisk.org/pub/telephony/sounds/.
For example, download asterisk-moh-opsound-wav-current.tar.gz,
extract it, and copy one of the WAV files to your sounds directory. Name it something simple like test-audio.wav.
Step 1.2: Create a Dialplan Extension
Now we'll create a dialplan extension (e.g., 100) that plays the audio file and then hangs up.
- SSH into your Asterisk server
- Edit your dialplan file (typically
/etc/asterisk/extensions.conf) - Add an extension in the appropriate context (usually
[default]or[internal])
[default]
exten => 100,1,Answer()
exten => 100,n,Playback(test-audio)
exten => 100,n,Hangup()
Configuration Notes:
- Extension: 100 (change to your desired test extension number)
- Audio File: Replace
test-audiowith the name of your audio file (without the .wav extension) - Context: Ensure the context matches where your test extension will be calling from
Critical Step: After editing the dialplan, you must reload it.
Connect to the Asterisk CLI and run: dialplan reload.
Alternatively, restart Asterisk: systemctl restart asterisk
Step 1.3: Test Your Extension
Manual Test: You can now test your extension using an existing phone
connected to your Asterisk instance. Calling the number you configured (e.g., 100)
should connect a call that plays the audio file and then hangs up.
Part 2: Configure VoIP Toolbox Call Testing
Using the same user details from our registration test above, we'll now add a Call test scenario. This will automatically test that calls can be made and completed successfully.
- Navigate to your existing Pulse endpoint in VoIP Toolbox Pulse
- Click Add Scenario or edit the endpoint to add a new scenario
- Fill in the form with the following details:
Required Fields for Call Testing:
- SIP URI
- Same as your registration test - the hostname of your Asterisk server and optional port.
- Protocol
- Same as your registration test - UDP, TCP, or TLS.
- Scenario Type
- Select Call from the dropdown.
- Auth Username
-
Same as your registration test - the extension number you created (e.g.,
9000). - Auth Password
- Same as your registration test - the password/secret value from your Asterisk configuration.
- From User
-
Enter your registering extension number (e.g.,
9000). This is the extension that will be making the call. - To User
-
Enter the number for the dialplan extension (e.g.,
100). This is the extension that will receive the call and play the audio.
Important: All the details are the same as your registration test, except we also need to complete a From and To number. From will be our registering extension. To will be our dialplan extension number.
Click image to view full size
After Saving: Once you complete the form and click Save, it may take a minute or two for the first check to run. The system needs to initialize the monitoring schedule before the first test executes.
Click image to view full size
Monitoring Active: Once setup, we can confirm it's working by heading to Details from our SIP endpoint page and viewing the SIP flow. The monitoring will continue running at your specified interval, keeping you informed about the status of your Asterisk call handling.
Get Started
Ready to set up active assurance for your Asterisk PBX? Sign up for Pulse to access our infrastructure assurance tools and configure monitoring for your PBX and upstream trunks.
Why Registration and Call Testing Matter
Registration and call testing are among the most important tests you can perform on your Asterisk system. Together, they provide comprehensive coverage of your PBX's core functionality:
Registration Testing Benefits
- Authentication Verification: Ensures your PBX can properly authenticate SIP registrations
- Early Problem Detection: Catches authentication and registration issues before they impact users
- Service Availability: Verifies that your registration service is functioning correctly
- Production Readiness: Confirms your system is ready to handle real user registrations
Call Testing Benefits
- End-to-End Verification: Tests the complete call flow from initiation to completion
- Call Routing Validation: Ensures your dialplan and call routing logic work correctly
- Media Path Testing: Verifies that audio can be established and maintained during calls
- Real-World Simulation: Confirms your system can handle actual call attempts like real users would make
Monitor Upstream Trunks
In addition to monitoring your Asterisk system, you can also configure monitoring for your upstream trunk providers. This gives you an early warning when issues arise. Get notified before your customers experience failures, allowing you to proactively address problems and maintain service quality.
Proactive Monitoring: By monitoring your upstream trunks, you can detect connectivity issues, authentication problems, or service degradation before they impact your customers. This early warning system helps you maintain high service availability and customer satisfaction.
Monitoring Best Practices for Asterisk
For Your Asterisk PBX
- Monitor all critical SIP interfaces (UDP, TCP, TLS)
- Configure appropriate check intervals based on your needs
- Set up email notifications for immediate alerts
- Monitor both internal and external SIP interfaces
For Upstream Trunks
- Monitor your upstream trunk providers
- Configure email notifications for immediate alerts
- Track historical performance trends
- Test different transport protocols (UDP, TCP, TLS)
Get Started
Ready to set up active assurance for your Asterisk PBX? Sign up for Pulse to access our infrastructure assurance tools and configure monitoring for your PBX and upstream trunks.